As a full-scale digital marketer, you surely run Facebook ads. And if you run lots of ads, this article is just for you.
Whether you work for an agency or ecommerce brand or run your own business, you constantly seek to improve every step of your Facebook advertising process – from creation to management, analysis and optimization.
In this article, we will focus on the Facebook campaign creation process and reveal several key practices which will drastically level up the process for you.
Let’s get started!
1. A/B test like a pro
There are two main reasons why you should not ignore A/B testing of your Facebook ads. First, A/B testing saves you money, and second, you gain invaluable knowledge after analyzing each test result. Both are key to becoming an advanced marketer. In addition, it’s almost free, given that you would have spent that budget anyway.
A/B testing your Facebook ads is a crucial step in drawing meaningful insights and optimizing your campaigns for better performance. Without A/B testing you are flying blind – there is no certainty that the creative you have designed or the audience you have defined will result in higher ROI and resonate better with your offer.
A/B testing is an almost free way to spend your ad budget efficiently and gain invaluable knowledge at the same time.
It’s crucial to differentiate what you are testing. Testing ad copy and testing conversion events are quite different things. Let’s group all possible testing variables under two main areas: Advertiser’s Offer and Facebook Algorithms.
1. Advertiser’s Offer: by testing ad design, copy, audience age or interests you either test out which of your offered creatives resonates better with your audience or define different types of audiences that you think may work for your ads.
2. Facebook Algorithms: By testing conversion events, delivery optimization or objectives, you test which Facebook optimization channel works best for your offer.
Find out more about A/B testing basics in our blog post How to A/B Test Facebook Ads in the Right Way.
So, the main questions remain: how do you define your variants, and how many is the optimum number? You have two choices – either test one parameter at a time or do multivariate testing with multiple parameters. Both options can lead to better results, but there is a time and place for each one.
Let’s dive deeper.
A/B with a single variable
Testing one variable at a time is the most commonly used practice in A/B testing, and there is a good reason for this.
Testing one variable is the only way to understand what moves the needle.
Here are some most common scenarios:
- Creative – compare different creative components like image, media type, text or CTA
- Audience – compare how well your ads are resonating with different audience segments by demographics, interests, locations, etc.
- Delivery Optimization – compare campaign performance with CBO enabled/disabled
- Placements/Platforms – compare placement types when reaching your audience
While it’s worth testing almost every field, this would require unlimited funds. It’s therefore necessary to define the granularity level of the test and group similar variants in one.
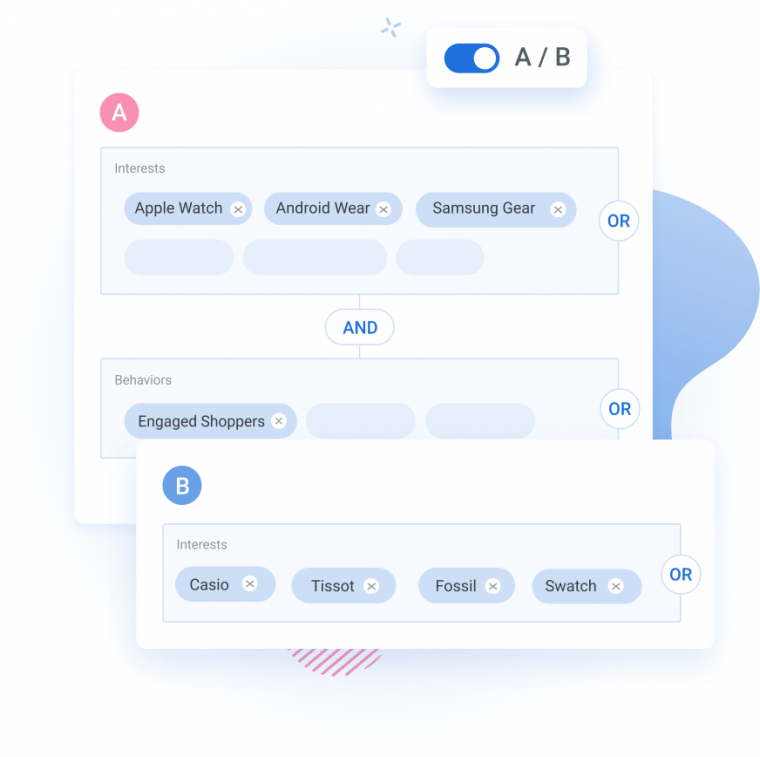
By testing group variants against each other, you will identify the winning behavioral pattern rather than a single variable and will find your niche more effectively. A clear example of such a practice is when A/B testing detailed targeting options, i.e. demographics, interests and behaviors.
Let’s assume you have a new watch in your store and want to identify the niche. Your hypothesis is that “smartwatch owners” are more likely to purchase versus those who prefer more “traditional brands”. At this stage you don’t care about specific brands and of course, do not have an unlimited budget to test each item.
So, you want to group “Apple Watch”, “Android Wear” and “Galaxy Wear” etc. lovers and test them versus “Casio”, “Tissot”, “Fossil”, “Swatch” lovers as a second variant.
Ads Manager’s native A/B feature does not support this scenario and you need to create separate audiences/adsets. To facilitate and streamline the process, we have developed “Group and A/B Test” functionality and integrated it into the Adscook campaign creation wizard.
With a few clicks you can create different groups. Plus you can add complex and/or conditions (not available in the Ads Manager) and include Custom Audiences in this filtering process as well. Join Adscook 30-day free trial to see this in action.
A/B with multiple variables
Test more than one variable at a time and identify the winning combination. While with standard A/B testing you can achieve this only after several successive tests, multivariate testing allows you to test more than one variable simultaneously and find the winning combination much faster.
Multivariate testing is like running multiple parallel A/B tests and a much quicker way to find the winning combination.
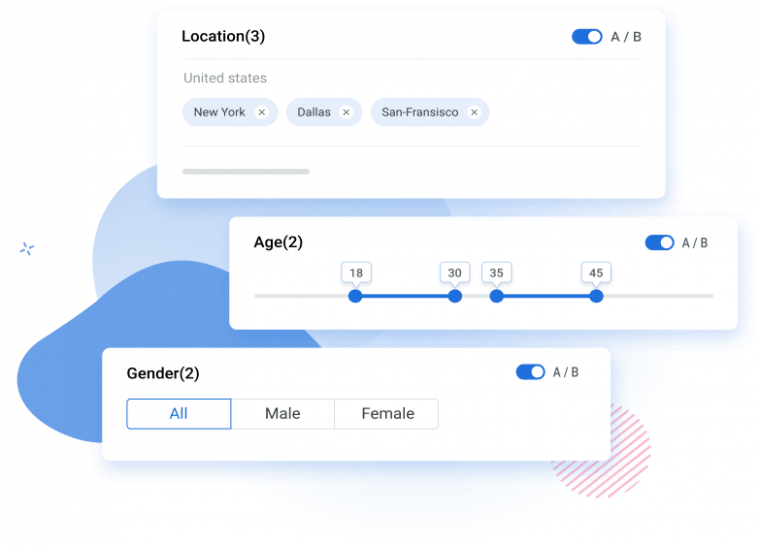
Let’s suppose you want to test a product in 4 locations and 5 interests with 2 creative images. In total, you need to create 4 x 5 x 2 = 40 ads (with 4 x 5 = 20 ad sets) and identify which combinations give a better ROAS.
While with Ads Manager you may spend hours to achieve this, you can use third-party Facebook advertising tools like Adscook and create it in a few minutes.
You just need to turn on the toggle “A/B test” for as many variables as you want to add versions either on an adset or ad level. You can control the number of variants to be published and even exclude some of them before publishing.
2. Keep your assets organized
Typically, creating and launching a single Facebook campaign from scratch takes around 10 minutes. If you do it once a month it’s not a big deal at all. But this is not the case with most marketing agencies or brands where hundreds of newer campaigns are published on a daily basis.
Although most advertisers have already set up a process that will automate the procedure, reduce the time spent and exclude human errors, almost all clients we have worked with still had lots of room for improvement.
The most common workflow we were facing was maintaining multilevel sheets for campaigns, adsets and ads. Creative/media assets were being held in Google Drive or other forms of cloud storage with linkage from the sheets. This is not a bad system, but it is far from efficient, especially when you work in a team.
The best way to make campaign creation much easier is by saving reusable components (audiences and creatives) in an organized manner.

Most advertisers generally use the same audience and creatives over and over again. For example, for the prospecting stage, you may focus heavily on interest-based targeting, thus define several sub-segments in your niche and use the same creative to see which audience resonates best.
Retargeting campaigns mostly involve custom audiences like website visitors, abandoned carts, etc.; either way, you create exactly the same asset every time or modify it slightly.
If there is no asset library, you may rely on your memory or use supportive documents which are difficult to maintain. Facebook’s native Audience Manager, Creative Hub and Media Library together are not so useful.
So, we have decided to ease the process of creating assets, organizing them and making them efficient.
Here is what you can do with Adscook:
- Set categorized tags
- Keep assets handy
- Group audience/creative variants
- Save field presets
- Define campaign defaults
Set categorized tags
Set one or multiple tags for the audience/creative to find them easily later. The way you tag your assets mainly depends on your business process. Use several tags to define multiple verticals.
Let’s look at a few examples.
Say you have created an audience and set 3 tags: “TOF”, “UK” and “Fashion Bags”.
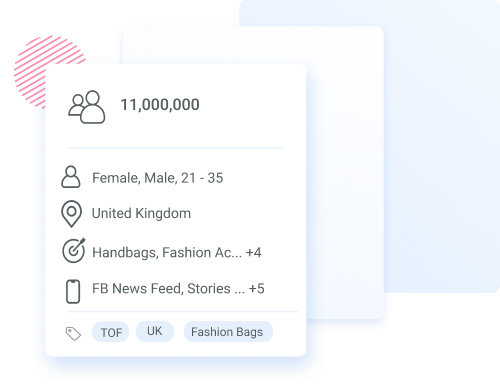
As a result, you can later categorize your audiences by those 3 tags and find all “TOF” audiences or the ones which relate to bags. The possibilities are endless, just make sure to maintain your naming convention.
Tip: Adscook will automatically suggest existing tags to make sure you don’t make duplicates.
The same applies to creatives.
Keep assets handy
It’s one thing to successfully save all your significant assets, it’s another thing to access them easily when needed.
So keep your saved items handy. This sounds simple but if you spend more than a few minutes searching for an item, you may end up relying on your own memory and simply creating a new one from scratch. Even a small difference in audience or in ad may result in a drastically different CPA.
In Adscook, we have integrated saved audiences and ads into the campaign creation process so that you can save and access the assets all from the same place without moving back and forth.
Group audience/creative variants
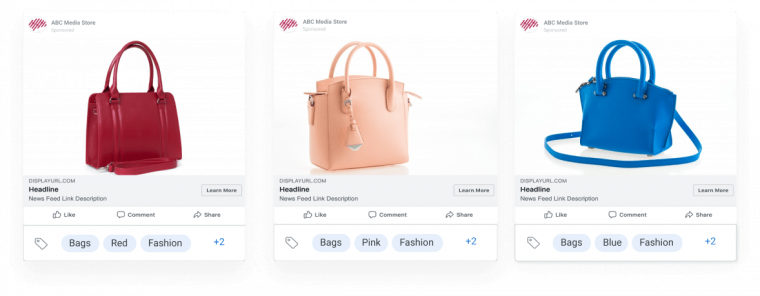
As well as saving single assets, you can save several variants as one grouped asset. This is especially useful if you are frequently doing A/B testing.
For example, if you always test 3 versions of an ad copy for a given product, you can save them as a group asset and use it during the creation process. Adscook will automatically launch 3 different ads so you don’t spend more time adding them one by one.

The number on the badge indicates the number of variants saved within the asset.
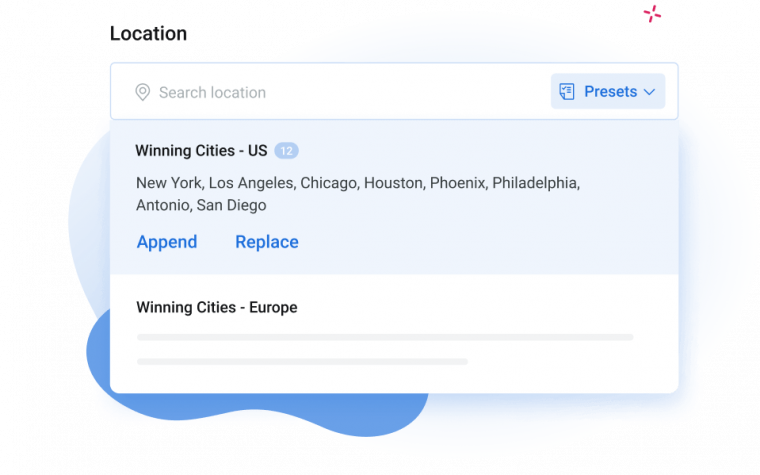
Save field presets
Sometimes you may need to reuse only some segments of your audience, not the whole defined audience itself.
Spend even less time on the manual creation process by saving any of your field values like locations and interests. For example, if you’ve identified winning cities in the USA and target the same group in every new audience, save this group to reuse it in future campaigns.
Alternatively, copy/paste whole fields from one asset to another and avoid repetitive tasks.
To save some parts of your audience, you just need to click on “Save as preset” above the field values. Now, every time you set your audience during the campaign creation process, just load, choose the saved preset and move on.
3. Name Correctly
As a busy Facebook advertiser, you need to be organized. It should take you just a few seconds to glance at your campaigns and figure out how things are going. You should spend just a few more to find any needed campaign or create funnel reports by grouping campaigns in TOF, MOF or BOF.
It seems easy, but if you have lots of items with names like “New Campaign Purchases”, “New Adset” or “Ad1”, the task becomes complicated. You are likely to end up digging into each campaign to find which is where, moving back and forth and losing the thread of what you were looking for initially.
The solution is simple. You need to apply a consistent naming system to your campaigns/adsets/ads.
Staying organized is even more crucial when you work in a team. The time you take now will save you time later during task handovers, reporting analysis and campaign management.
Let’s check a few of the most common best practices for applying a consistent naming system across all levels of your Facebook ads – campaign, adset and ad.
Campaign Name
The ideal campaign name will include the following qualifiers:
- Client Name
- Page Name
- Campaign Objective
- Item Promoted
- Current date
- CBO (if you have enabled CBO)
- Funnel Stage
You may choose one or a combination of 2-3 qualifiers depending on what factors are key at the moment in your strategy.
The result will look something like this (you’d replace each qualifier with corresponding data): [Client Name] – [Page Name] – [Item Promoted] – [Objective]
Adset Name
You need to set more parameters on the adset level, so expect your adset naming to be longer and more descriptive.
Parameters you can use at the adset level:
- Audience type – saved audience, custom audience or lookalike audience
- Audience targeting details
- Placement
- Budget – daily/lifetime
- Bidding type
- Optimization
- Pixel event
- Pricing
An example would look something like this (you’d replace each qualifier):
[Audience Targeted] – [Daily/Lifetime Budget] – [Placement] – [Optimization] – [Pricing] – [Other Variations]
Note that it’s not essential to use all the parameters when describing your ad sets if that parameter is not a key differentiating factor. For example, if you always run your campaigns on all placements, you don’t need to mention this parameter in the naming every time.
Ad Name
The best qualifiers to effectively name your ads:
- Existing post/new ad
- Ad type (image, video, collection, carousel)
- Ad copy/design details
- CTA button
An example would look something like this (you’d replace each qualifier):
[Existing Post/New Ad] – [Ad Type] – [Copy/Design Details] – [CTA Button] – [other variations]
Now that you know how to name your campaigns properly, let’s automate the naming process by using dynamic macros. You can do this directly in Facebook Ads Manager or, if you need more options and flexibility, give a try to Adscook.
Get more organized with Adscook Dynamic Macros
With Adscook, you can set any possible parameter for naming on a campaign, adset or ad level: this is more than Facebook provides.
Plus you can set ad account level templating to differentiate campaign naming in different accounts. This is especially handy for agencies that work with different clients who already have established naming conventions. So, set an ad account level template and forget about time-consuming manual naming. Try it with Adscook now.
With Adscook macros, you can also generate campaign-specific tracking URLs and always have organized views in Google Analytics or other external analytics tools.
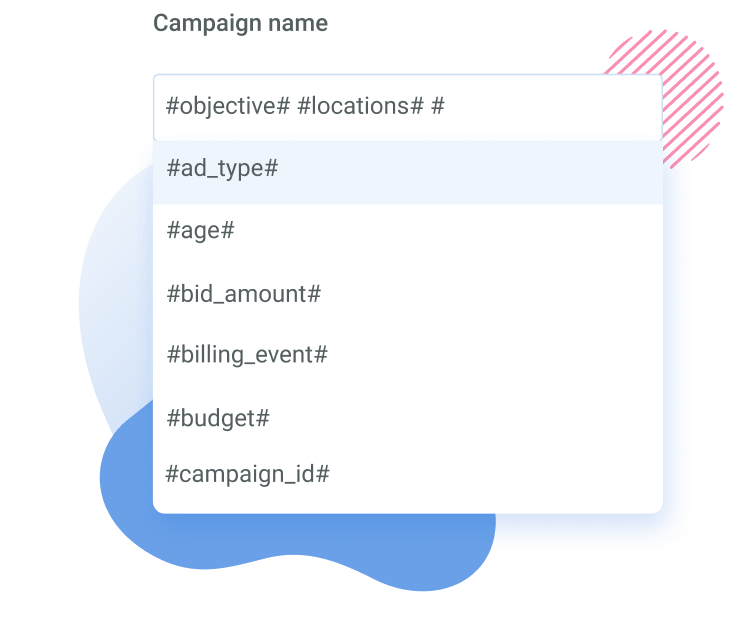
When creating your campaign, you will have the option to automatically name your campaign/adset/ad. It’s as simple as that: just type # and choose from the variables suggested on each level. These variables will be converted to texts after publishing.
For example, if you set your campaign name as #objective #locations, it will be converted to “Conversions USA|AUS|UK|CA” after publishing.
To set naming templates on the account level, you just need to select the ad account, click on settings and add the relevant variables on all three levels.
Now it’s your turn
I hope these tips were useful and have inspired you to improve your campaign creation process.
Start as you mean to go on: the right creation establishes a strong foundation for your ads which will later lead to easier management and faster scaling. If you want to make the most of these tips, sign up now and try Adscook free for 30 days.
If you already have your effective campaign creation system in place, share your experience with us in the comments section below and let’s build a better advertising future together.