Time is the new currency, as any busy Facebook advertiser knows only too well. More time equals more clients and, therefore, more money. So, how can you add additional heads and hands to help you earn more money and still have time left for your family and friends?
It’s simple… Automate.
Perhaps the idea of Facebook’s Automated Rules seems intimidating. Maybe you’ve been ignoring this tool, thinking that you’re fine with things as they are because, after all, you trust yourself more than a system to do things for you. However, this could be just a fallacy, because in reality, Facebook Automated Rules can make things easier, save you time and improve your ad performance if you use them correctly and effectively.
So, today we are going to cover:
- What Exactly Are Facebook’s Automated Rules
- Anatomy of Facebook’s Automated Rules
- Practical Guide: How to Create Facebook Automated Rules
- 3 Common Examples of Automated Rules
What Exactly Are Facebook’s Automated Rules?
Facebook Automated Rules automatically monitor your ads and take any optimization actions required on your behalf or inform you when any changes occur.
This is the dream of every overloaded advertiser. When juggling multiple client projects with large budgets, day-to-day checks, updates and optimizations are a must, otherwise it’s only a matter of time before something goes wrong. With Automated Rules, Facebook suggests automating all these manual actions, keeping your costs under control and, ultimately, maximizing your ROAS.
Do you want to increase your budget if the CPA is below an allowable amount? Check! Do you want to pause an underperforming ad set? Check! Do you want to be notified when your ad frequency is high? Check!
Automated rules can successfully execute your commands based on conditional if-then statements. You could say “Hey, Facebook, be alert: if you see my ad spend has been over $100 within the last 2 days, then turn it off”, and the tool will do exactly as you ask because it never sleeps, never takes a vacation and never calls in sick. Sounds amazing, right?
Now that we’ve discussed the essence of Facebook’s Automated Rules, let’s take a closer look at their anatomy!
Anatomy of Facebook’s Automated Rules
The structure of Facebook’s Automated Rules is actually pretty simple. Let’s break down the main parts:
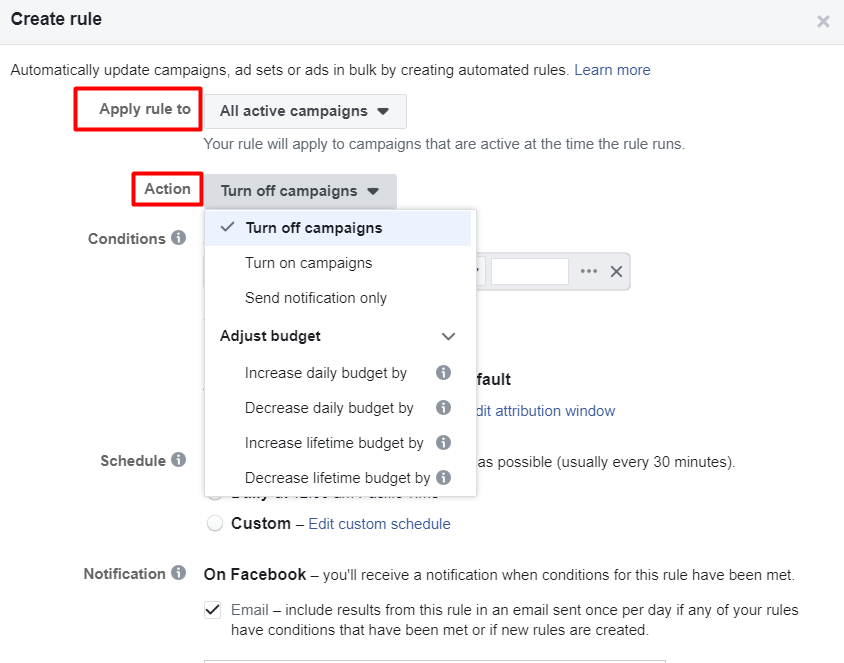
Apply rule to: This variable is about the active campaign, ad set or ad level that you want your rule to act on. You can either choose a specific one or set your rule to affect all active campaigns, ad sets or ads.
Action: This variable decides which action your rule will take on your chosen asset. Actions include turn on ads, turn off ads, adjust budget, adjust bid and send notification only. Be aware, however, that actions change depending on your campaign, ad set or ad level. For example, adjust manual bid (Increase bid by, Decrease bid by, Scale bid by target field) actions come up only at the ad set level, while at the ad level the available actions are turn on ads, turn off ads and send notification only.
Conditions: Conditions define specific metrics that should take place in order for your specified action to trigger as a result. This is the most important part as it requires you to have done some serious thinking about your business goals. For example, you need to decide whether a particular amount of ad spend is high or low for your business and turn it off or increase your budget accordingly.
Metrics are numerous and grouped under categories like Most common, Settings, Time, Mobile app events, and Website conversions.
Here are some of the most common metrics:
- Spent
- Lifetime Spent
- Frequency
- Results
- Cost per Result
- Mobile app install
- Cost per mobile app install
- Mobile app purchase ROAS
- Website purchase ROAS
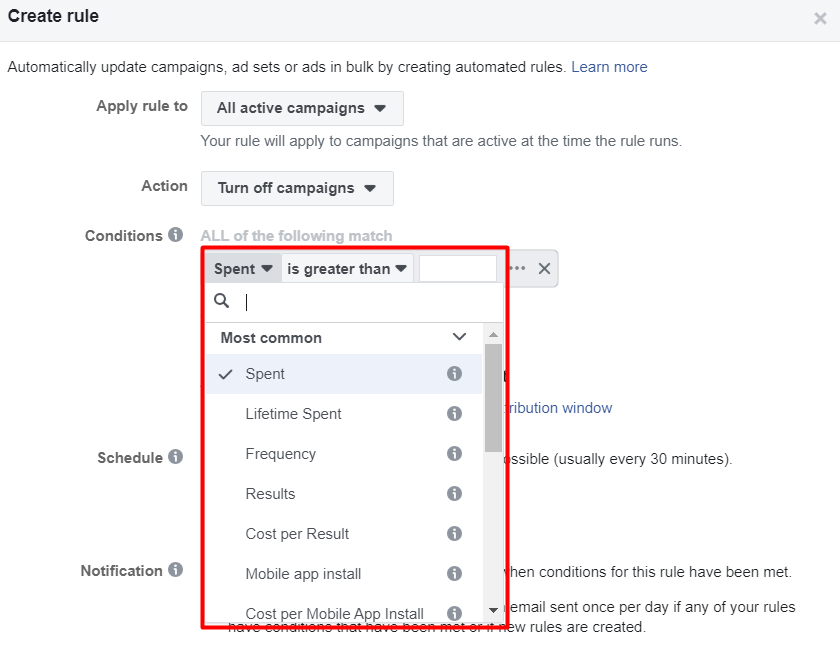
The metric to express something is grouped with logical expressions and numerical values, such as is greater than …, is smaller than …, is between … and …, and is not between … and ….
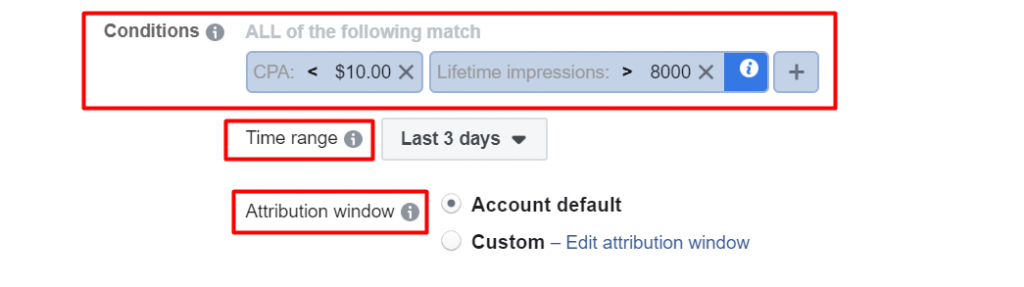
To make the condition complete, there is also Time range, which allows you to decide which time range data you want the rule to capture.
Attribution window determines the days between when someone viewed or clicked on your ad and took the desired action. You can leave it on default (after viewing ad – 1 day, after clicking ad – 28 days) or select custom settings.
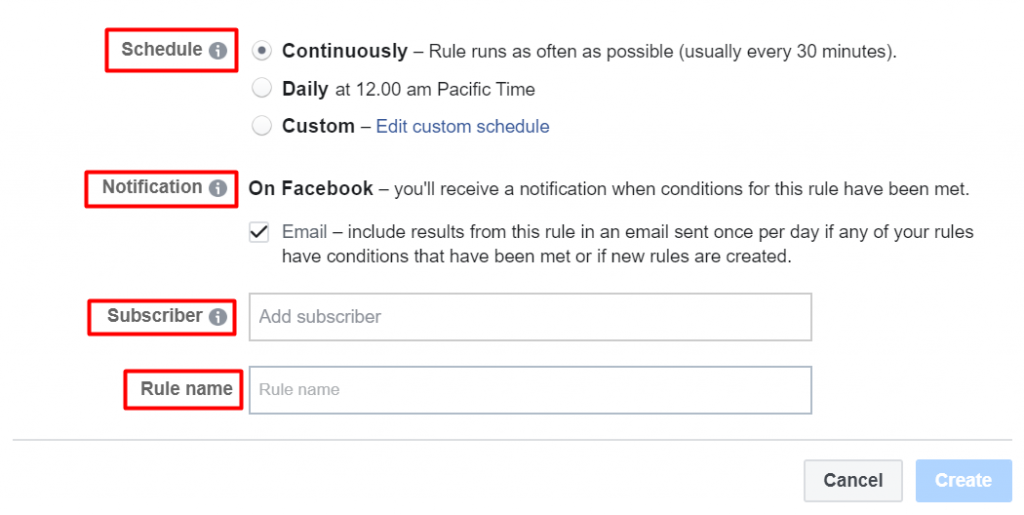
Schedule: Here you specify the schedule/frequency according to which you want the rules to be checked and executed if conditions are met.
Notification: This specifies that Facebook will notify you once a certain rule is performed. If you tick Email, the notification will also be sent to your email address.
Subscriber: Here you specify subscribers who will receive the rule results. Only those people who have access to the ad account can be added.
Rule Name: Lastly, you should give your rule a name: it’s a good idea to think of a descriptive one so you’ll remember it in future.
Practical Guide: How to Create Facebook Automated Rules
Enough about theory: let’s take a look at automated rules in action! In this section, we’re going to walk you through the process of setting up rules from scratch.
Step 1: Select the Campaign Level
Before you even begin to create a rule, bear in mind that rules only work on active campaigns, ad sets and ads.
There are two ways to create Automated Rules:
- When you want to apply your rule to all active campaigns, ad sets or ads
- When you want the rule to affect a specific asset, i.e. a specific campaign, ad set or ad
Therefore, if you want your rule to act on all campaigns rather than specific ones, go to Ads Manager and click on the three-dot menu. Hover over All tools in the drop-down menu and select Automated rules in the Create & manage section.
Next, click on the green button, Create Rule. In the pop-up window you’ll see the option “Apply rule to”. Go ahead and select one of the three options: All active campaigns, All active ad sets, or All active ads.
If you want to apply the rule to a specific asset, go into Ads manager, select one or more active campaigns to which you want your rule to apply and click on Rules → Create a new rule. The same popup window will appear, only this time you’ll see that the specific campaign has already been selected. From there, you can choose the option of active ad sets and ads that belong to that campaign. In the same way, you can select the specific ad set or ad to which you want your rule to apply.
Step 2: Decide Which Action You Want the Rule to Take
Once you’ve selected the level, it’s time to choose the automated rule action. As we have chosen Ad set level, the following actions are available: Turn off ad set, Turn on ad set, Turn notification only, Adjust Budget and Adjust manual bid. So, let’s select the Turn off ad set action.
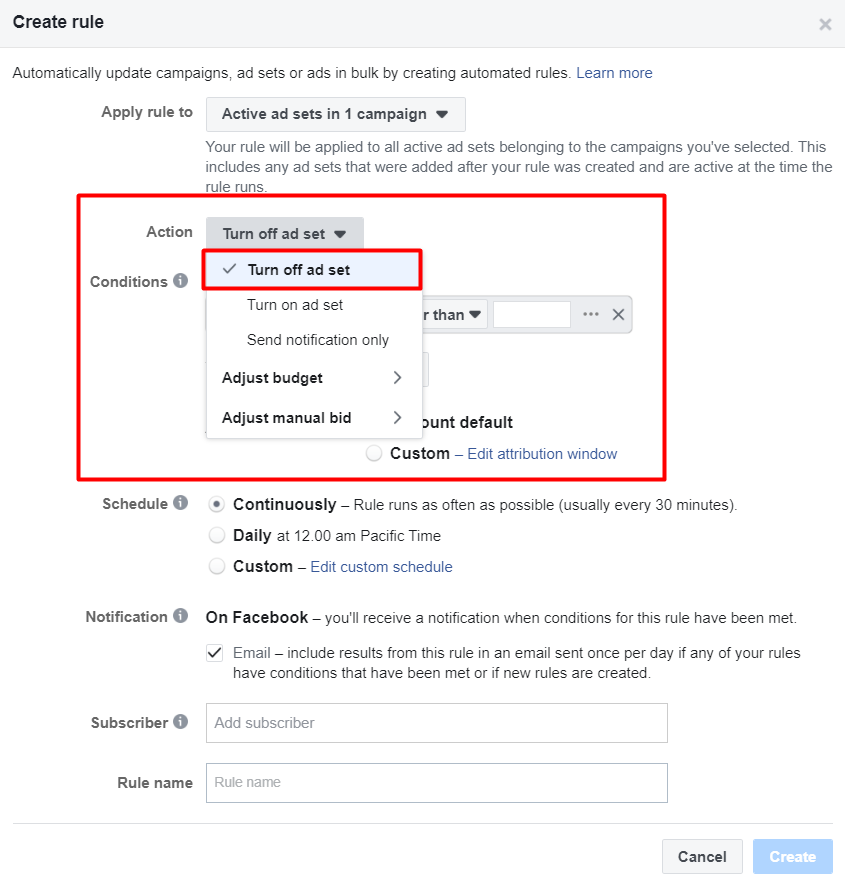
Note: If you’re not yet sure what action you want Facebook to take, you can always simply be notified of your ad changes by selecting the action Send notification only.
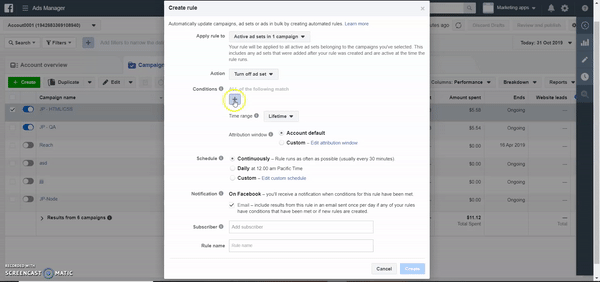
Step 3: Define the Condition That Will Trigger the Rule
At this point, you need to define under which condition you want the ad set to be turned off. As previously mentioned, this depends on your business goals. What change in your ad set will be critical for your business to tell Facebook to just shut it off?
Let’s choose CPA from multiple metrics to define the condition. Suppose that a CPA of over $20 is unprofitable for your business, so you wish to turn off the ad set once this condition is met.
After selecting CPA, set the logical expression is greater than, enter the numeric value $20 and click Apply.
For the second metric, click on the plus sign, select Purchases from the list of metrics, set the logical expression is smaller than and enter the numeric value; in our example, this will be 1.
Note: In Facebook’s native Automated Rules tool, two or more conditions are connected with the AND logical operator only, which means that all relations should match in order for the expression to be true. Therefore, if you want the rule to trigger when at least one of the relations is true, but not all of them, Facebook has a limitation here. You’ll need to look for a third-party tool if you want to have this feature at your disposal.
Adscook provides great opportunities to create complex rules with And/Or logical expressions thus taking your Facebook ad management to the next level. If you want to see it in action, join now and start 30-day free trial with Adscook
To add even more context to your condition, let’s choose the time range Last 3 days and leave the Attribution window with the default values.
Step 4: Tell Facebook How Often to Check Your Rule
Remember that you’re giving Facebook a command, so it needs to be defined in as much detail as possible. Continue with Schedule to instruct Facebook as to how often it should check the condition and trigger the action if it is met.
- If you choose Continuously, it will check the rule as frequently as possible (usually every 30 minutes)
- If you choose Daily, it will check the rule every day at 12.00 a.m. Pacific Time
- If you choose Custom, you’ll be able to adjust the schedule on specific days and times
In our example, let’s choose Daily.

If you want more flexibility with your rule scheduling, try a third-party tool like Adscook. This enables you to check the rule as frequently as you wish, from every 15 minutes to every 72 hours, or you can go even further and set the time range to whatever you want it to be, whenever you want.
Step 5: Tell Facebook Who Will Be Notified
It’s now time for Facebook to report back to you about its actions. You can be notified of the results both in-app and via email if you wish.
Step 6: Name Your Rule
Lastly, give your ad rule a descriptive name and click on the Create button. Congratulations, your first rule is now up and running!
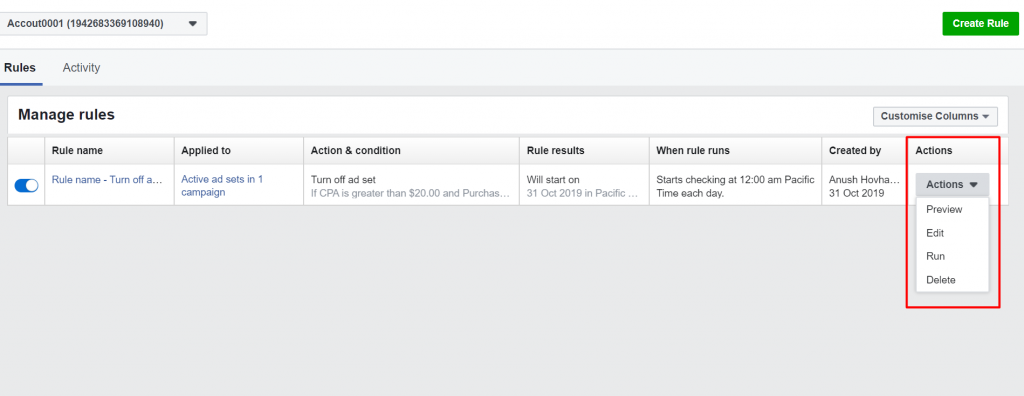
Step 7: Post Factum: Manage Your Automated Rules
After creating your rule, you’ll be taken back to the Automated Rules dashboard. Here you can monitor and manage all your rules: preview, edit or turn on/turn off any rule, track all the changes affected by the rules and tweak them for more precise performance.
Let’s Create Facebook Automated Rules – 3 Common Examples
Example 1: Increase daily budget on ads that yield winning results
Condition: CPA is lower than $10, Purchases are more than 2
Action: Increase the daily budget by 20% once daily
Time range – Last 3 days
Here’s how this will look in Ads Manager:
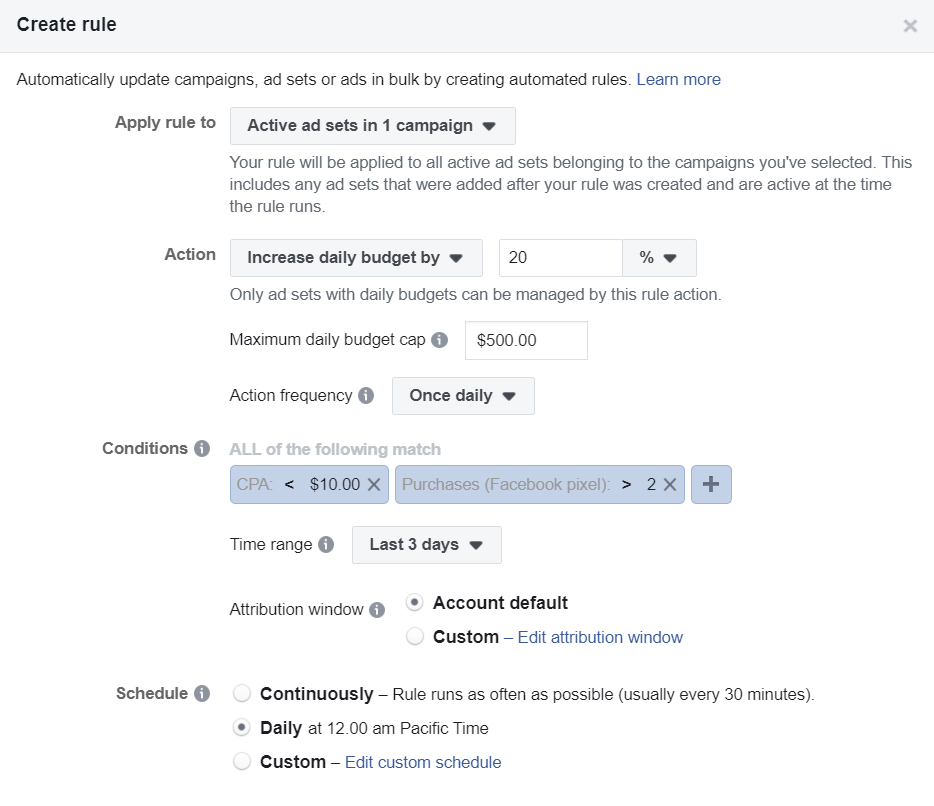
This rule allows you to generate even more sales by increasing your budget by 20% daily because recording more than 2 purchases in the last 3 days with a CPA of less than $10 is a great payoff that’s worth more investment. This is only true, however, if your product is priced higher than the CPA!
Example 2: Turn off an underperforming ad
Condition: Website purchase ROAS is smaller than 2
Action: Turn off ad set
Time range – Last 7 days
Let’s see how this will look in Ads Manager:
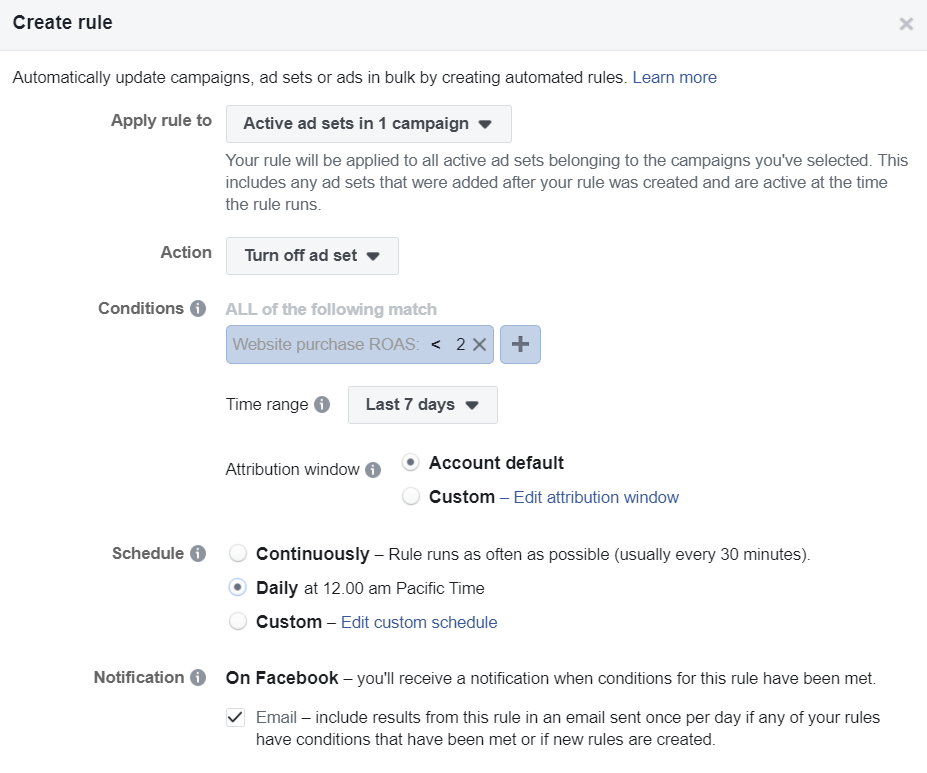
As you know, ROAS is one of the most important metrics, if not the most important, when it comes to measuring the efficiency of your campaigns. With this rule, then, you simply tell Facebook that a ROAS below 2 (200%) is not acceptable for your business, so it’s better to turn off the ad. A time range of 7 days allows the ad enough time to gain traction.
Example 3: Send notification in case of high ad frequency
Condition: Frequency is greater than 2, Lifetime impressions is greater than 8000, CTR is lower than 3%
Action: Send notification only
Time range: Last 30 days
In Ads Manager, this will appear as follows:
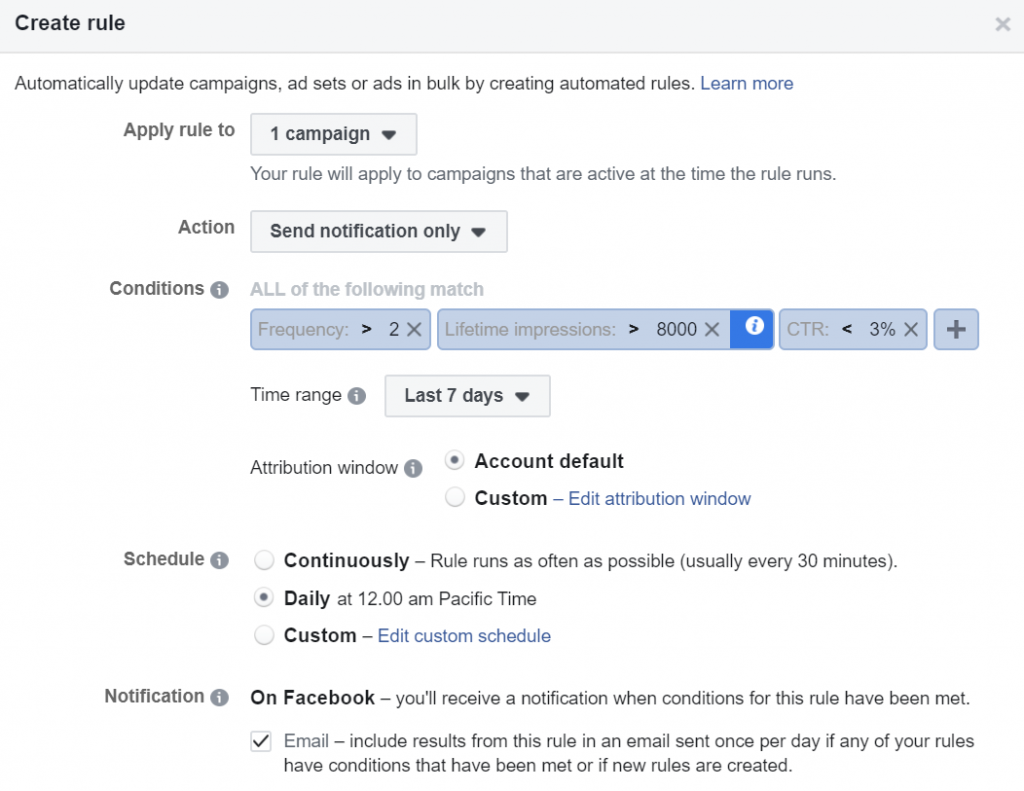
As you know, ad fatigue can damage even the most successful ad. This issue occurs when your audience grows tired of seeing your ads over and over again. The aim of this automated rule is to protect your ads against ad fatigue.
Let’s suppose that if ad frequency is more than 2 but CTR is lower than 3% in case of impressions more than 8000, this could damage your ad performance, so of course you’d like to be notified if that happens. You can change the metrics at any time, at your discretion.
To Sum Up…
Ultimately, there’s nothing intimidating about Automated Rules. Why would you bother to come back to Ads Manager every 2-3 hours to check your ad performance when you can have Facebook do it for you?
If you’re just beginning to dip your toes into Automated Rules, start by taking a couple of simple rules discussed in this guide, testing them and experimenting with them until you feel comfortable enough with the idea of automation.
Have you ever applied an automated rule to your Facebook ad campaigns? How did it go? Feel free to share your thoughts on Facebook’s Automated Rules in the comments section below!